Using European Power Plugs with Brazil's new type of Power sockets
Using European Power Plugs with Brazil's new type of Power sockets
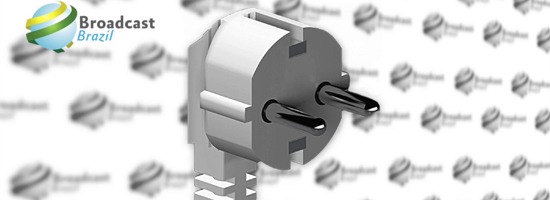
Using European Power Plugs (Type F connector Schuko) with Brazil's new and old type Power sockets. It will safe you a headache when you are on location.
video:
Like us if you want on Facebook, and follow us on Twitter and Subscribe to our YouTube channel.
Control FCPX with your iPad!
Control FCPX with your iPad !
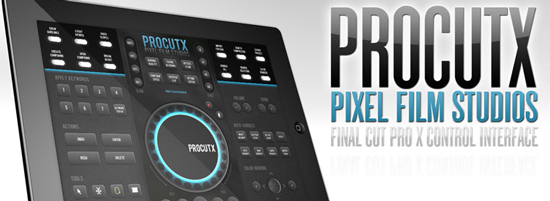
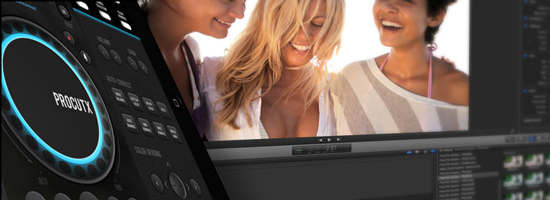
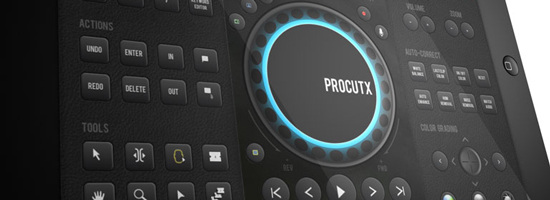
We are back for writing a review on mobile use in the broadcast world. Here at Insights we will test a new app for iPad to control Final Cut Pro X. PROCUTX for Final Cut Pro X is an iOS iPad application that allows editors to control Final Cut Pro X on their MAC through an iPad. Designed by Pixel Film Studios and created by LightWORK Solutions Inc
Note: Compatible with iPad. Requires iOS 5.1 or later.
Let’s start with some key features of the app, which include:
• Precision Timeline Scrubbing
• Quick Retiming
• Auto-Correct Color
• Color Grading
• Compound Clip Editing
• Import, Export, and Rendering shortcuts
• Quick Keywording
• Fast access to Tools
• System Volume Control
• Timeline Zooming
• Audio Enhancements
• Record Voiceovers
It has been build to meet the needs of today’s creative editors and breaks free from the idea of menus, tabs and shortcut keys to better streamline the tasks of the editor.
First thing we need to do now is install the Software on our Mac to communicate with the iPad. When you open the ProCutX app it will let you fill in your e-mail to send the installation instructions.
You can also download the installer for OSX 10.7 (Lion) and OSX10.8 (Mountain Lion) here. If you're running OSX 10.6 (Snow Leopard) , support is still experimental, although we are testing it on 10.6 just to see how it goes.
You can download the 10.6 file here. Open the disk image you downloaded and find the "ProCutX Keyboard Set.commandset" file. We'll be importing this into Final Cut Pro X.
Open Final Cut Pro X and choose the Final Cut Pro menu → Commands → Import. Choose the ProCutX Keyboard Set and import it.
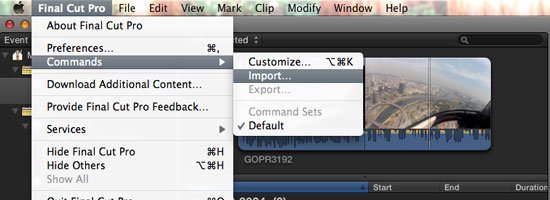
FInally, choose the Final Cut Pro menu → Commands menu and ensure the "ProCutX Keyboard Set" is active.
Now select the ProCutX Server.pkg in the disk image you downloaded and follow the instructions. You can start it in you System Preferences now.
Important: Your Mac and your iPad must be connected to the same network.
Trick: We realized that sometimes ProCutX can’t find the network, in that case just switch it off and again on in system preferences and you’re good to go.
Let’s go to the iPad and open ProCutX, you should see a list of available computers with your Mac listed. Go on and select it and you are “Ready To Go!”
Note: If you don't see the connection screen tap the connection status text in the center.
We tested the app and also made a small video controlling everything using the ‘internet sharing’ option on the iMac and having the iPad connected to it.
It makes the connection faster and more stable.
ProCutX: So what can we do with it exactly?
Timeline Scrubbing
The main dial in the center of the app let’s us scan the magnetic timeline in the project by simple dragging our finger around the wheel. By moving your finger around the precision dial you can simply move the playhead frame-by-frame. Their are also buttons that allow moving forwards and backwards to the cut points in the clips. These buttons also work in the Event Library and where we view our clips, pretty handy and it speeds up the process of adding for example Keywords.
Note: The little button with the ‘square’ symbol in it selects the clip you are currently hovering in your project!
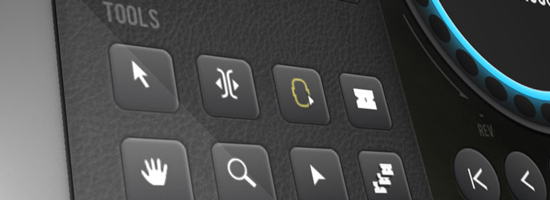
Controlling the Editing Tools
There is a toolbox on the bottom left of the app, you can make your edits using these buttons. A handy one is the Blade All tool, the one on the right bottom side, this cuts all the clips (video & audio) that are layered on top of each other at once. But one of the problems with some of these functions is that you may be able to select a tool like Range Selection or Trim, you can’t apply it to a clip. we still needed to drag the mouse over the clip to select it. Of course this still is a time saving feature, having your main editing tools all in front of you, it sure speeds things up.
Color Grading
Maybe one of the most practical things when finalizing your video, controlling the Color Board’s exposure, saturation and color using the ‘directional’ pad in the bottom right of the app. Although it works rather nice, the Color Grading section is quite small, in our opinion it deserves a bigger space or maybe even a separate screen. Also, a Reset button would be practical to start from scratch when you messed things up.
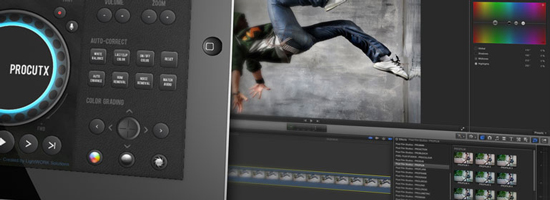
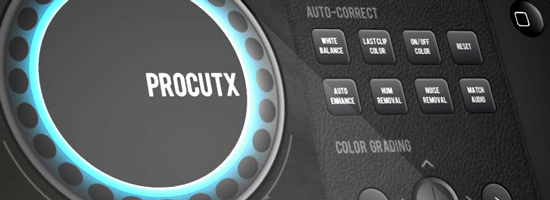
One Tap Auto-Correction
If you are a big user of the auto-correct functions, you can now simple leave the Inspector behind you and auto-correct the clip’s white balance, color and noise removal. This works great and saves a lot of time, of course if you like to fine-tune your audio, as many editors do, you still need to get your mouse going.
Clip Compound
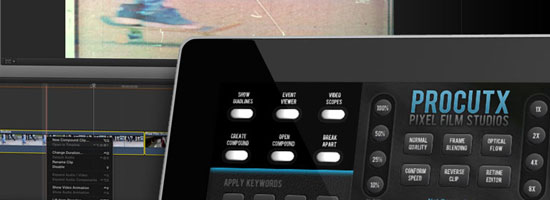
With the Compound Clip controls, you can group a complex set of elements and collapse them into a single clip just by tapping the button in the top-left corner of the app interface. You can then open or break them apart later with the other designated buttons.
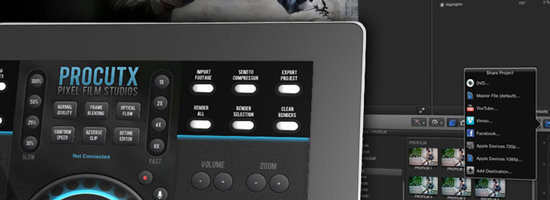
Streamline Import & Export
Import, Export, Render...... all possible with designated buttons in the app, it gets the job done fast and easy, just simply pushing a button in the app.
Other Functions
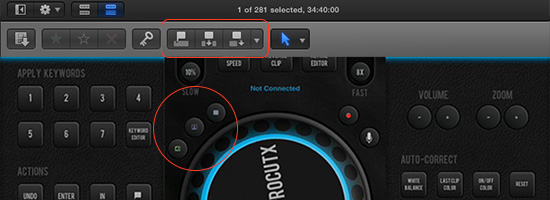
There is a lot more in the app then you will see at first sight, some buttons took even some time to figure out. On the left top side of the interface dial you see three buttons, these let you pick between the ‘video and audio’, ‘video only’ or ‘audio only’ options of Inserting video and connecting or appending the video file to the story line. See the picture below for a visual.
Keywords are great to better organize all our clips, with a simple click you can open the editor or simply apply shortcuts with the buttons number 1-7.
Note: Only remark here is that there are 9 shortcut keys in FCPX and we have 7 on screen.
Volume and Zoom, two very simple but extremely useful functions, as well as the Actions section.
What we really love? The option to toggle the Audio Recorder on and off, and even start and stop the recording, that is a feature!
What is our “Opinion”
ProCutX, it comes with a great proposition and a very clean designed interface. Most of the functions will certainly speed up the workflow although some important ones are missing. For example it would be great to have the Scroll Wheel connected to the Tools. Need to move an audio track just a few frames? Imagine toggling the Select Tool and use the Scroll Wheel to reposition the audio track. This is probably one of the most important things to have in a future update. It may take some time to get used to all the options, being that they are crammed into a small space, which can be confusing to look at the first times you use it. Is it replacement for the mouse and keyboard? It isn’t and also can’t be.... simply because we can use the mouse and keyboard by feel while keeping our eyes on the visuals. But..... having this app as an add-on is great and makes your workflow much faster! Even if you are thinking of using just a few of the options in this app, it is worth the buy, and of course, many updates are planned being it is a new app. ProCutX shows a lot of potential and promise!
Tutorial video:
Watch more on our video's page!
UPDATE 27 of May 2013:
New in Version 1.1.2
ProCutX is now a Universal App! Access the most useful ProCutX tools at the touch of a finger on your iPhone.
Here also some practical links:
Pixel Film Studios
Lightwork Solutions Inc
ProCutX in the App Store
.... Surprise!! .....
We got a great deal from the guys over at Pixel Film Studios.
They are a well known company when it comes to making FCPX Effects and Transistions.
You now have until the 26th of march 2013 the chance to buy these Effects, Transitions or even Bundles with a discount that Pixel FIlm Studios offered especially for our readers, you!
Just go to our Facebook page on facebook.com/BroadcastBrazil and search for our posts with the code in it!
It shouldn’t be hard to find it, we’ll be posting every day the code is valid.
And if you didn’t already, Like us and share the post and article to have your friends also enjoy the discount!
Mentioned:
Pixel Film Studios
Lightwork Solutions Inc
iPad
OSX
FCPX
ProCutX
Be sure to check us and Like us if you want on Facebook, follow us on Twitter and Subscribe to our YouTube channel.
Lot's of news, photo's and info for broadcasters, webcasters and mobile producers in Brazil.
by Niek van Esch
Lower Third Graphics
What, Why & How?
In this Insights article we are going to talk about the lower thirds, how to use them what not to do and even better, which software you can use to make them, including a short video tutorial about creating lower thirds in Adobe Photoshop.
In broadcasting, webcasting and video in general, the graphic at the bottom of the screen is called a lower third. The name suggests this graphic occupies the entire lower-third of the screen, but this is not (necessarily) the case.
Mostly lower thirds are used to identify the person speaking in the video.

Lower thirds are actually very versatile. Somehow most people relate them to News – but since they are versatile, they can be used in almost any type of video. Other uses of lower thirds include identifying the location or a time change in the story.
Now you might think, so what are exactly the 'rules' for these. Well, there are no specific rules or regulations for what a lower third should look like or what information it should contain. Instead, lower thirds should be used as support to the content of the video. When something needs to be explained, a lower third can do this without distracting the audience from the rest of the video.
When it comes to actually making these lower thirds there are some important things to keep in mind, which we will talk about now.
It may look quite simple, but they are pretty tricky things to build.
A ground-rule you can use is 'less is more'.
Often you will see "text only" graphics, even in big productions, this has a reason. Is your objective to only inform, plain text is a thing you can consider.
The best fonts to use are in general "Sans Serif" or have subtle edges. Text with small curved/ornate parts tend to flicker on screen.
Don't forget to stay far from thin fonts, those for sure will flicker to on screen.
The font Helvetica, often use by graphic designers, works great on video.
Also, the color should accompany the theme of the video, although a good option always is a white font with a drop shadow, this pops out nicely for readability
Note: Sans Serif means without Serifs, those tabs that hang on the points of some fonts

If you want to get more creative with lower thirds, start with adding a background image. Start simple with a solid color that is complimentary of the text. For web videos, a solid background is perfect because they're easily compressed and won't get blocky when played back. The background can extend beyond the viewable area of the screen as long as it stays on the lower third.
Note: Too many times you see crazy filled up graphics with loads of colors and what not more,
before you go completely loose always keep in mind that it is merely an extra to inform about what is happening in the video, not to take the full attention from the actual subject.
3D graphics and animation
Another great thing is using animation/motion in your lower thirds, these animations you can create inside your video editing program, or in animation software like Motion from Apple or After Effects from Adobe.
Motion is software that has a lot of good templates for you to start with, they are also editable so even with few knowledge you can get some great animation going.
If you are a FCP (Final Cut Pro) editor, it gets even easier, FCP has a content library featuring titles, transitions, effects, and generators, most of which are Smart Motion Templates. You can open any of these templates in Motion and customize them, then publish your modified template to FCP by saving it. The new template then is available for immediate use.
For everything it offers Apple's Motion is also pretty cheap, costing just $49,99
www.apple.com/finalcutpro/motion/

The nice thing about using these 3D animation packages is that you can be even more creative and create an extra dimension that, depending on the subject, can add an extra to the total experience.
When preparing the graphics for lower thirds you always need to keep the Safe section in mind. So what does this mean?
Well, if you would place your text to close to the sides it can be that it will be cut off on screen due to an amount of circumstances, as simple as people watching on a tv with a different format.
Almost every graphics program, like Photoshop, Illustrator and also Motion and AE (After Effects) have empty templates to start with. These mostly have the safe lines already in there, as you will see in the Video Tutorial.

So even without any knowledge about graphics and lower thirds it nowadays gets easier and easier to create great additions to your video production, or even webcast.
Hopefully this gives a better idea about the Lower Thirds, and feel free to aks any questions or give us your opinion about the article.
Tutorial video:
Watch more on our video's page!
Be sure to check us and Like us if you want on Facebook, follow us on Twitter and Subscribe to our YouTube channel.
Lot's of news, photo's and info for broadcasters, webcasters and mobile producers in Brazil.
by Niek van Esch
Dual track Audio Editing in Final Cut Pro X
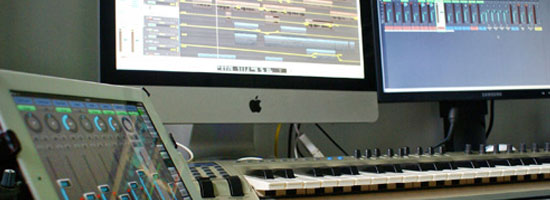
For todays article we are back at Eschtudio.
Located in Brazil in the state Rio de Janeiro, Eschtudio works with Logic Studio and Final Cut Studio.
A small studio focused on music production for visual media and video-editing.
We will give you a nice way to do Dual track audio editing in FCPX.
To some the new FCPX may seem a bit confusing due to it’s complete change in lay-out and way of working and thinking.
If you are used to having separate audio and video tracks, like in FCP7, you can find yourself getting frustrated in how to do your audio mixing and fine-tuning.
In FCP7 it is very easy to open the Audio Mixer and mix the tracks using the mouse for single tracks or stereo pairs and record the fader moves as keyframes.
You can imagine this is very pleasant to work with, for example using the earlier discussed V-Control Pro app for iPad and iPhone.
Here we will show you the way that gives you full control in the audio editing/mixing process within Final Cut Pro X.
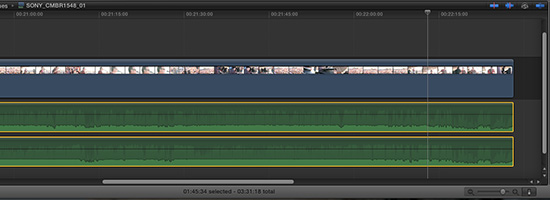
Each Video clip had audio married to it, it is connected appearing to be a single unit, of course this is also done to save confusion for people not acquainted with the concept of handling audio and video separately.
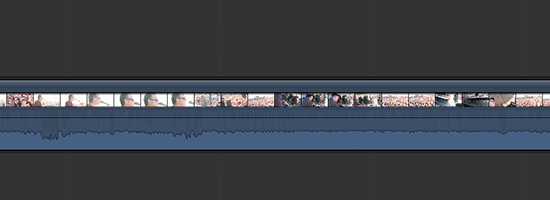
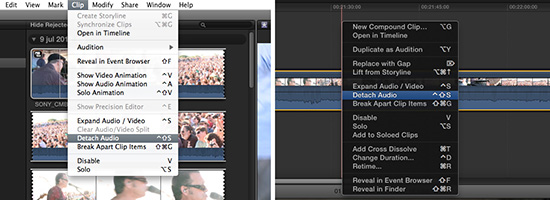
But for the ones who need to have separate Audio and Video, simply highlight a clip, or clips in the Timeline and choose Detach Audio from the Clip menu or use the ctrl+click and select the Detach Audio option.
You can now see a single audio track and above it the video track. Separate the audio simply by dragging to see if it is detached.
Note: be careful with this because it is a delicate business detaching Audio and Video
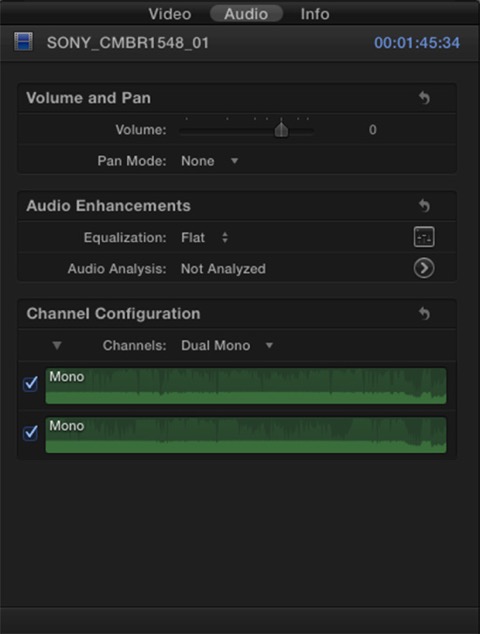
If you select the audio track in the Timeline and open the Inspector (Window/Go to Inspector) you can see the options for this Audio track like Volume and Pan.
When selecting the audio track and ctrl+click and Open in Timeline you will find also the Channel Configuration in the Inspector Window, letting you choose between Dual Mono, Stereo and Reverse Stereo, as well as the option for (de)activating the separate Channels.
But what if you really want to edit the audio as two separate audio tracks. The default for earlier versions of Final Cut Pro was 2 tracks, whereas Final Cut Pro now only provides a single track.
For this to be done stay in the TImeline where we left off and use again ctrl+click, this time select Break Apart Clip Items.
Note: this also works without needing to Detach the Audio from the Video.
Simply select the Clip(s) in the Timeline and ctrl+click Open in Timeline, then choose the Break Apart Clip Items option.
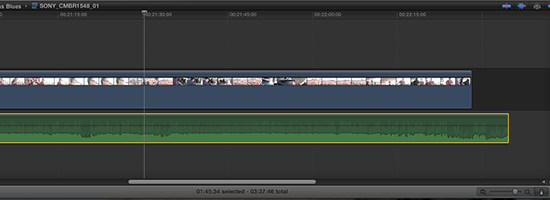
Now you are ready to edit the 2 separate audio tracks, and you can edit them as you wish, as separate tracks, razor blading, keyframing and so on.
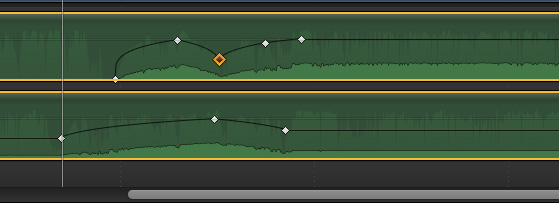
To return to the complete timeline of your edit, the project, just use the back arrow on the top left of your timeline.
This gives you full control over your audio in FCPX.
The drawbacks of FCPX and Audio.
Being said there are things that make the earlier versions stand out in editing audio.
What if your record with for example an XDCam and find yourself with 7 mono channels, there is simply no way to separate them and edit them like you would in the Earlier versions of Final Cut Pro.
Also when you use the Opening in Timeline option to edit your audio you cannot hear the other Audio from the project, making it sometimes difficult to do precise mixing.
Be sure to keep Final Cut Pro version 7 next to the new version when you are going to do heavy editing.
Trimming, Color Correction are way better then the earlier versions but the Audio still needs some tuning in this great Video Editor.
Tutorial video:
Watch more on our video's page!
Hopefully this was a helpful insight in the Audio Editing possibilities in the new FInal Cut Pro. Keep tuned for more insights here on Broadcast Brazil.
And more practical links:
Direct link to Apple FCPX
And the free version of V-Control
Be sure to check us and Like us if you want on Facebook, follow us on Twitter and Subscribe to our YouTube channel.
Lot's of news, photo's and info for broadcasters, webcasters and mobile producers in Brazil.
by Niek van Esch
Mobile Control in a Studio environment
Review apps for controlling DAW's related to Audio & Video production
Eschtudio is first up in writing a review on mobile use in the broadcast world.
Located in Brazil in the state Rio de Janeiro, Eschtudio works with Logic Studio and Final Cut Studio. We will be talking to you about some nice apps, from out this studio, that work perfectly as controllers for these DAW’s.
A small studio focused on music production for visual media and video-editing, so no 64 channel mixers, hardware controllers etc.
Here we will test an app on the iPad to control your DAW.
In case you have a hard time remembering what DAW means, it is quite simple actually; Digital Audio Workstation.
Be sure to check the Broadcast Brazil Facebook page.
We will be giving away one free redeem code for the V-Control Pro version with the value of $49,99.
So like us and share the article post on Facebook to make a chance on this great app.
So let’s kick off the first article with a very well known control app called V-Control Pro from Neyrinck.
It is a control app that is specifically made for controlling DAW’s like Logic Pro, Final Cut Pro, Pro Tools and Cubase. It works by defining MIDI-controllers like sliders, buttons, rotaries and knobs and connecting them to parameters like filters, EQ, etc, in your application.
Neyrinck is talking about possibilities for Android and multiple iPad control, for now there has not been announced any specific date or more detailed information.
Starting with Logic Pro
Installing
First off let’s start with the install process.
V-Control uses the iPad’s Wi-Fi capabilities to communicate with your DAW, so make sure the DAW computer and the iPad are connected to the same
local area network (LAN). Making a computer-to-computer network, or having you host computer using a wired connection can even better the functionality.
In the review we simply use them both wireless on the same network.
On this link you can find the Ney-Fi program, this is a free utility that you need to install. It creates a virtual software MIDI port for the D.A.W. software to communicate with V-Control over your network. This utility must be running so V-Control can detect the DAW
trick: Put the Ney-Fy in your program start-up so you don’t have to think about it every time you use V-Control.
HowTo:
For the Windows installer:
-Launch the "Ney-Fi Setup.exe" application to install the Ney-Fi app,
MIDI driver and runtime libraries.
-The runtime libraries installer is a separate installer that you will
need to authorize. Make sure to also install Bonjour if it is not
already installed.
Link to Bonjour download
For the Mac Installer:
-Double-click the downloaded installer to unzip the downloaded
installer package, if Safari has not automatically done so.
-Double click the “Ney-Fi.pkg” icon to launch the mac installer
-Follow the installer’s onscreen instructions to complete the
installation process
Now let’s get to the good part, getting it to connect and work.
Advised is to have Logic updated to version 9.1.6, but we are testing also with a lower version for people that don’t work with Lion yet, and no problem at all.
So did you already download the App? If you prefer to try it out first, there is a free version available here, of course this version doesn’t have full functionality.
Tip: disable the Bluetooth function on your iPad, this may help with a better connection
Setting it up for the first time:
Launch Ney-Fi
Launch Logic
Launch the V-Control App
In the settings screen of V-Control, select the “computer” tab and then
select the computer that Logic is running on
In the “DAW” tab, select “Logic”
Since V-Control acts as a “native” Logic control surface, Logic should
automatically detect the V-Control app as a valid control surface once it
has finished launching
Logic will then display a message that it has detected a new control
surface called “V-Control” and will offer to add it to its list of supported
control surfaces. Click “OK”
At this point, the computer running Ney-Fi will be available to choose from
in the computer table that is located in the settings window. V-Control and
Logic will now have complete bi-directional control of each other.
IMPORTANT NOTE: When Logic presents the dialog box that it has detected
a new control surface. It will offer a checkbox option that says “Do not display
this window again”. Checking this box will turn off the automatic discovery
process of new control surface and thus turn off automatic installation of
control surfaces.
DO NOT check this box! It is very important to have Logic always
automatically detect attached control surfaces, in order for V-Control to work
correctly with Logic.
The Main Screen
So now let’s see what V-Control can do. For this review we grabbed a pop/rock song with some guitars, vocals etc to have a good view on it’s possibilities.
Since this is a little bit a technical review we will be passing a lot of detailed information about the app.
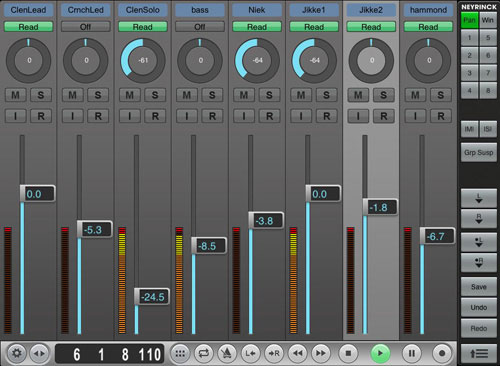
The basic layout consists of 8 channel strips which all have their own Name Display, which is very important not to get to messed up when working on 24 or more tracks.
You can simply select these channel strips by touching the track name.
Automation Mode under the channel name let’s you choose all the basic functions like Off, Read, Touch, Write and Latch.
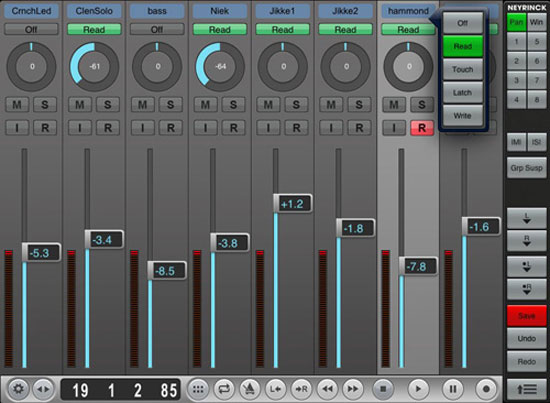
Rotary Encoder This knob allows you to adjust both channel panning,
as well as auxiliary send levels 1-8, for the corresponding channel. Their specific
function is selected using the “Pan” and “1-8” buttons on the right hand side of
the interface.
Under the rotary you find the Mute (M),Solo (S), Input Monitor (I) and Record (R) buttons with their specific functions in Logic.
Of course a very important function is the fader for control the signal levels of the tracks. The iPad has a multi-touch interface which makes it possible to adjust multiple faders at once, just like on a real hardware mixer. A very good thing is when adjust a level on one of the faders, the actual dB level is shown above the fader cap, so you always have a good indication. The Level Meter is very accurate in displaying the signal level of the audio channel.
When you are working with multiple channels you might want to switch rapidly to other channels, there are 2 options to do this, using two fingers you can swipe left or right to switch 8 banks at a time. When using one finger, swipe left or right to bank one channel at a time. When keeping your finger down you can continue dragging to increment more then one channel.
Tip: touch the surface area above the fader, not in the area of the fader cap!
When first seeing all these options you might think.... what do they do?
It is actually quite simple. Pan puts your rotary know (that round thing above the M and S buttons) to panning mode, while the 1-8 buttons switch the rotary knob to send controls.
The IMI and ISI buttons are very handy, they simply unmute and un-solo all channels, that is a real time saver!
Also the option to suspend track groups is practical.
the L and R buttons with a down arrow let you set the mark points, while the •L and •R buttons let you set the auto-punch points. Imagine you are recording some guitars on distance, these 2 options are a great help!
Of course you can also save your current session and undo and redo the mess you created.
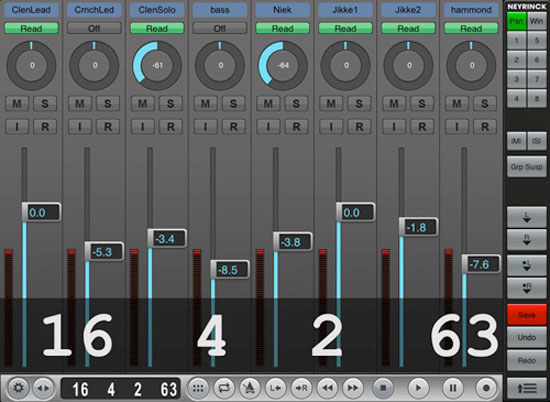
Controls on the Bottom
The two left buttons let you select the general settings and shows you an extra option for selecting banks.
The time counter displays the current time in Logic, and it can display as SMPTE, minutes/seconds or bars and beats.
![]()
Trick: Swipe left or right on the time counter to issue a jog/shuttle command to
the transport. This allows you to move the play head and jog/shuttle the session
audio.
Next to the time counter you find the pop-up button which shows you extra controls like choosing your counter, setting markers and enabling auto-punch.

Next up are some well known functions like Loop, Metronome, the Left and Right buttons that let you move your playhead to the current mark-in and mark-out points. The rewind and forward buttons let you head backwards or forwards by one beat each touch you give.
And of course we have the Stop, Play, Pause and Record functions.
Trick: you want to have big transport controls? Open the Transport pop-up button and choose Big at the counter functions.
Now you can already find your way in the basics of V-Control for Logic Pro, but there is more..........way more!
Maybe you think, did they forget that button on the right bottom side of the program that I’m seeing? No, we haven’t, now comes the good part!
Clicking this you will see the Edit window with options like choosing your Screen Set, the possibilities of cutting, pasting etc. the automation section where you can toggle on/off all these amazing functions.
option of turning on and off the Windows is great, if you often open the environment window, but never want to have it statically in front, this option let’s you simply do that.
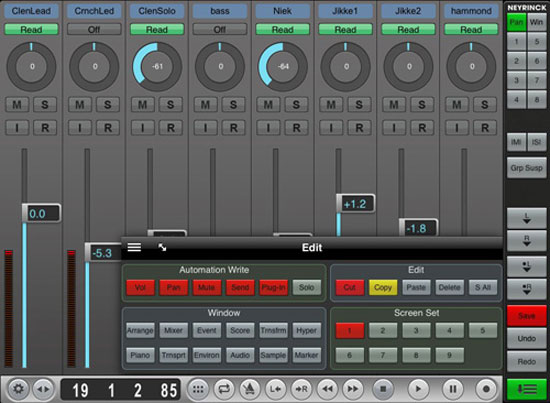
Now for sure you have seen the fullscreen button on the top left side of the Edit window, and next to that their is another button with 3 block, there is some nice stuff behind that button.
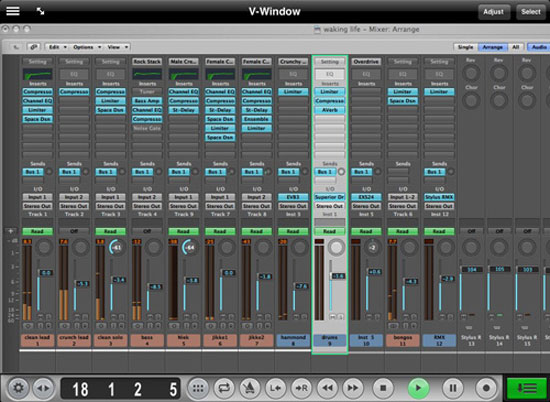
V-Window
The V-Window, this is simply an amazing extra they put in V-Control since their last update. It let’s you simply pick which program you want to see in V-Control by clicking the select button and select. So then what is so nice? You can control whatever you select. Under here a picture of the EVB3 plugin from Logic, now that is handy when you are far from your D.A.W. but you still want to do something about the sound.
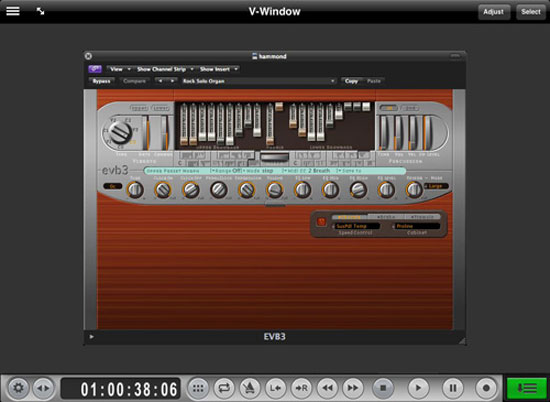
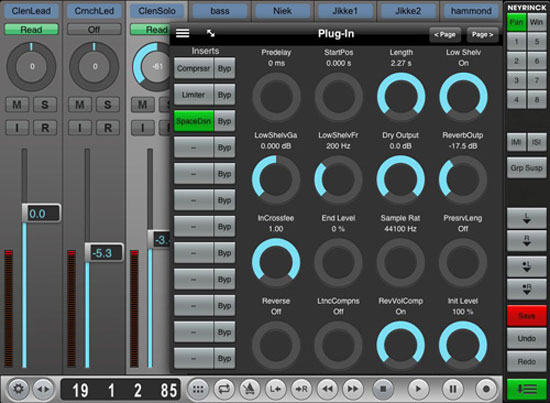
Plugin
It simply shows you the controls for the plugins you are using in each channel, just select you channel and you are able to control everything. The
Tip: double tapping a rotary changes the control to its minimum position, double tapping again puts in in the maximum position.
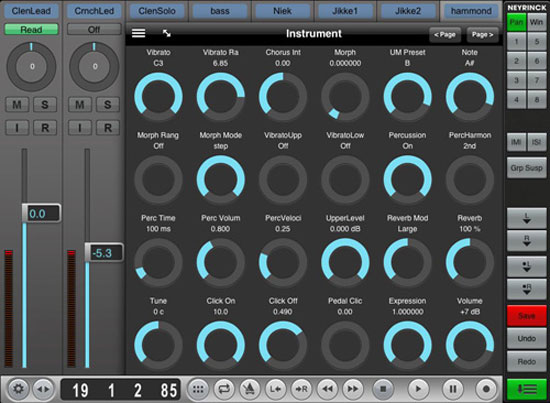
Instrument
You already guesses it, control the parameters of your software instruments, controlling the Pedal Sustain of the EVB3 is a piece of cake like this.
Live
So this was all studio talk, but what if you are in a live situation and wanting to use some plugins from Logic Pro live with you master keyboard and controlling the instrument parameters with your iPad. With a computer-to-computer network this works like a charm.
Can you imagine all the possibilities of starting loops from your iPad, or record and control the audio from your own gig.
Still reading and getting interesting in the Video section of this article?
When asking for a possibility for controlling Final Cut Pro, Paul Neyrinck himself mailed with information about a soon to come update, that was two weeks ago, and guess......you now can!
Note: V-Control only works with FCP 5,6 and 7 because of the changed control surface protocols made for FCP X
So here comes an extra part for all the video-editors out there, controlling Final Cut Pro
Installing
The basics of the install are equal to the above installing instructions given for use with Logic Pro.
After you have installed Ney-Fi launch the V-Control app on your iPad, it is very important to launch before opening FCP. After it is opened, launch FCP.
Next in the Tools menu in FCP you select “control surfaces” and in this list of options select a “Mackie Control”.
Select V-Control as the midi in- and output ports for your selected surface and close the configuration window.
In the settings screen of the V-Control app connect with the computer running FCP and in the DAW tab select Final Cut. They should be automatically connected.
Important: Do not forget to open the “audio mixer” in the tools menu in FCP and to leave it open, if not the V-Control app will not respond and recognize the control surface!
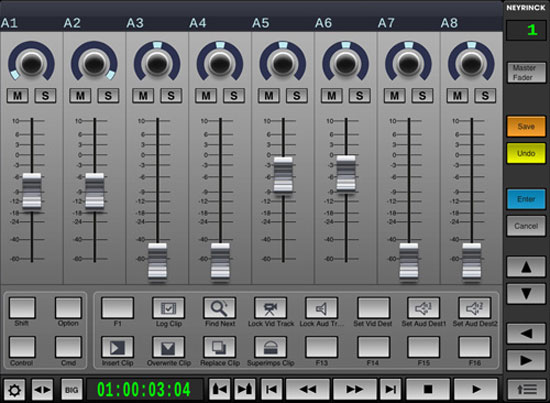
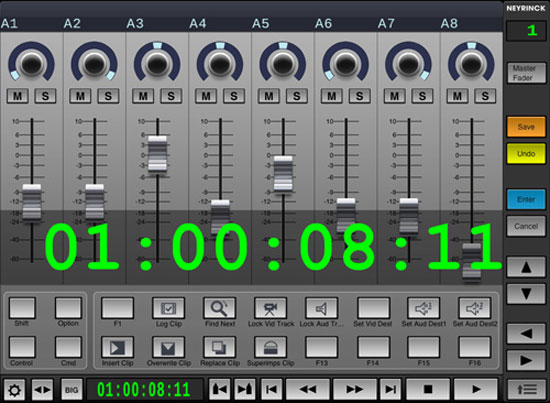
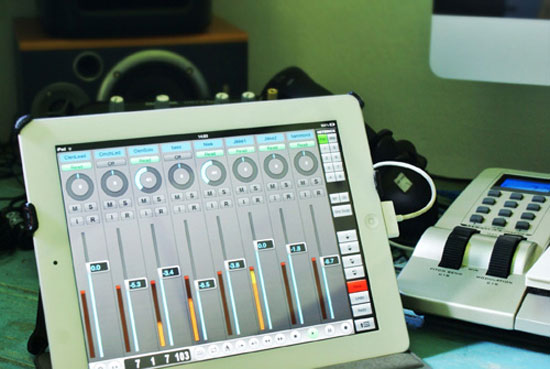
The Main Screen
On the top part of the screen you will see names like A1, A2 etc... these are your audio channels, which have of course the well known pan rotaries, mute (M) and solo (S) buttons and faders. On the right hand side you will also see a Master Fader which controls your total audio.
There are 8 channels per bank, the banks can be controlled by swiping or using the button on the left bottom side next to the settings button.
A great thing here is that the iPad supports multi touch, so you can easily control more then one fader at a time.
Trick: Double tap the fader to return the audio track to Zero
There are two faders modes in FCP, which you can select in the right top of the Audio Mixer window, if you turn the “Record Audio Keyframes” off whenever you adjust the fader level and let go of the fader level, that level is maintained throughout the clip.
Each time you pass over a clip the faders jump to show you your levels, which is even better then a hardware mixer where all the faders keep moving around.

When turning the fader mode on, every fader move you make will be recorded as Keyframe audio level automation.
On the right side you will see also the basic “save” and “undo” controls as well as the “enter” button which functions as a keyboard Enter command, while the “cancel” button has the Escape key function from the keyboard.
The up-down and left-right keys are the same as on your keyboard. The up-down keys let you move to the next and previous clips. The left-right keys move one frame at a time.
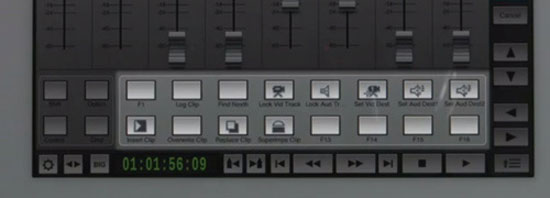
Controls on the Bottom
The transport window as many people call it.
It is pretty straight forward and has all basic functions needed for controlling FCP.
We already checked up on the two left buttons, the “settings” and “banks”, so guess what the “BIG” button does? Yes it shows your timecode very big on the screen, very handy.
Next to the Time Counter screen you will find the following buttons. The first two let you jump forward or backward between markers in you sequence, great! Coming after that is the “go to start” button with next to it the Rewind/fast forward buttons, which increase speed by tapping on them. After that comes the “go to end” button and of course we cannot miss the play and stop buttons.
Note: The Transport Section will operate in the Viewer, Canvas or Timeline, whichever is in focus
Shortcut keys
There are to many options in this window to name them one by one, that will make a very long article.
You find 80 separate customizable shortcut keys. They can be assigned within Final Cut to the functions of your choices, and they can also be assigned custom labels.
The shortcut keys work as follows:
They are set up as a group of 16 softkeys, which correspond to the F1-F16 keys on a computer keyboard.
Alternate sets can be accessed by pressing one of the four latching modifier buttons, which are situated left of the 16 softkeys. When pressing one of these four buttons the interface will switch to another set of 16 softkeys
You can assign custom functions to the keys selecting Tools/Keyboard Layout/Customize from within FCP. The use this “custom keyboard layout” window to map the functions to the desired keys.
When pressing and holding one of the softkeys you can access al the options for assigning the shortcut you want
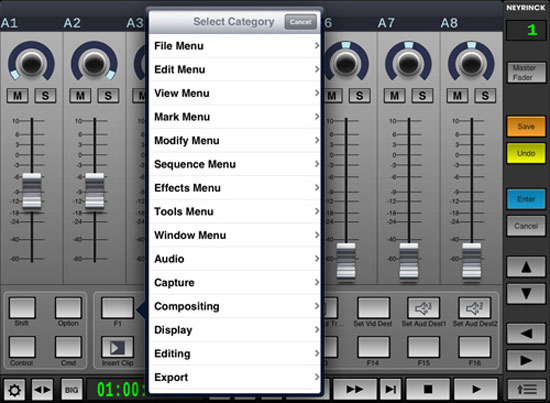
Hint: When you have favorite effects you use a lot, you can assign these to the softkeys, making your life a lot easier.
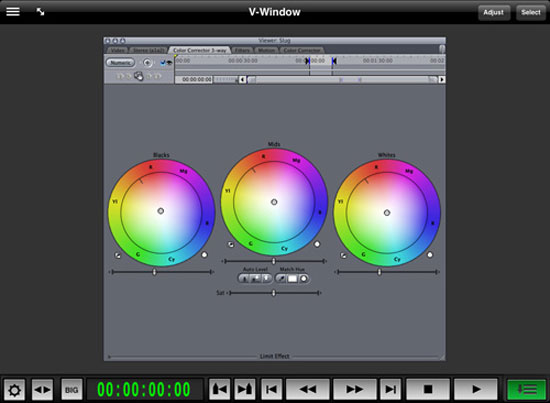
V-Window
You might remember our reaction for this option in Logic Pro, in FCP it is the same thing. One of the things many editors don’t like to do by mouse is using the color corrector. Now you simply can do this in the app using the v-window, and that works very smooth!
Total Opinion
Eschtudio is a production studio, most of the work is done in one room, recording the guitars, bass and pianos etc. The V-Control is extremely practical for this.
Most of the time when recording an acoustic guitar, with two microphones around yourself and no one to push the record button apps like these are an incredible good solution, it is a portable wireless controller, even multi-touch functioning.
Besides this it works very smooth and has a very fast response, even when working completely wireless with the D.A.W.
For video editing this app is extremely useful and it works flawless, and that being the first update with this option for controlling FCP in it.
Besides that it saves a huge amount of time because of the customizable workflow.
When you are one of those “only” hardware freaks, this is a good alternative without spending too much money, Most people don’t like to control faders with a mouse, and to control with your fingers is actually very natural, so even for you guys this works perfect.
Most DAW’s support the function to use hardware controllers along side V-Control
All the functions are very well displayed and organized, after checking V-Control calmly you realize that everything you need is simply there, even the controls for your plugins and software instruments.
Tutorial video:
Watch more on our video's page!
In terms of usability this app earned a place in the top 10 list for mobile control on the iPad, worth a shot!
And if you think....not convinced yet, don’t worry there is a free version available in the app store so you can check it out, test it, and convince yourself.
After reading about audio and video of course there is also some great viewing material available on the Neyrinck website.
Four videos talking about the V-Window, Logic Pro, Final Cut Pro and an overall review.
Be sure to check them out!
UPDATE 17 august 2012:
NEW IN VERSION 1.6 Aug 13th 2012 - New DAW Modes
Adobe Audition, Digital Performer and Media Composer
New MIDI Driver for Improved Window Support
New retina hi-definition graphics for iPad 3
UPDATE 22 februari 2013:
New in Version 1.7
Jog/Shutte Wheel - All DAW modes have a jog/shuttle wheel.
Audition, Final Cut 7, and Media Composer have fixed wheel in the user interface.
All other DAW modes have an optional wheel.
Two-finger double-tap the mixer to show/hide the jog wheel for all other DAW modes.
Two-finger drag to quickly activate shuttle (Pro Tools, Logic, Cubase, Final Cut, Media Composer, Audition)
Preferences - New preferences section is displayed in Setup popover
Optionally place transport at top of screen
Optionally disable transport controls
Optionally disable fader double-tap
Optionally set for transparent jog wheel display
Optionally set for Cubase +12 dB max gain
Draggable Multi-Panel - The multi-panel window can now be dragged and placed anywhere.
Smarter Multi-Panel - The multi-panel window now remembers which mode is selected.
UPDATE 14 november 2014
New in Version .8
Adobe Premier Pro Support
Logic X Support
OS X Yosemite
iOS Compatibilty
V-Control Pro 1.8 is compatible with any iPad running iOS 7 or iOS 8. Apple's first-generation iPad is not compatible with iOS 7 or later. If you use a first-generation iPad you must use V-Control 1.7.
And more practical links:
The Neyrinck Website
Direct link to App Store for V-Control Pro:
Direct link to utility Ney-Fi
And the free version of V-Control
Be sure to check us and Like us if you want on Facebook, follow us on Twitter and Subscribe to our YouTube channel.
We will be giving away one free redeem code for the V-Control Pro version with the value of $49,99.
So like us and share the article post on Facebook to make a chance on this great app.
by Niek van Esch
Insights
News and information on all the technical possibilities and functionalities used on location, at events, in studio's or at your editsuite.
Insights is technical matter for technical people. Stay tuned for the first insights... first one will appear in february 2012 and will be about mobile solutions in the broadcasting world.
Want to write yourself for the blog or Insights, just contact us to receive the information.
Be sure to check us and Like us if you want on Facebook, follow us on Twitter and Subscribe to our YouTube channel.