Dual track Audio Editing in Final Cut Pro X
For todays article we are back at Eschtudio.
Located in Brazil in the state Rio de Janeiro, Eschtudio works with Logic Studio and Final Cut Studio.
A small studio focused on music production for visual media and video-editing.
We will give you a nice way to do Dual track audio editing in FCPX.

To some the new FCPX may seem a bit confusing due to it’s complete change in lay-out and way of working and thinking.
If you are used to having separate audio and video tracks, like in FCP7, you can find yourself getting frustrated in how to do your audio mixing and fine-tuning.
In FCP7 it is very easy to open the Audio Mixer and mix the tracks using the mouse for single tracks or stereo pairs and record the fader moves as keyframes.
You can imagine this is very pleasant to work with, for example using the earlier discussed V-Control Pro app for iPad and iPhone.
Here we will show you the way that gives you full control in the audio editing/mixing process within Final Cut Pro X.
Each Video clip had audio married to it, it is connected appearing to be a single unit, of course this is also done to save confusion for people not acquainted with the concept of handling audio and video separately.

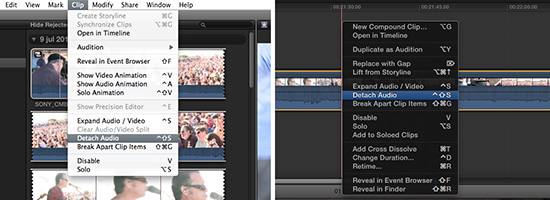
But for the ones who need to have separate Audio and Video, simply highlight a clip, or clips in the Timeline and choose Detach Audio from the Clip menu or use the ctrl+click and select the Detach Audio option.

You can now see a single audio track and above it the video track. Separate the audio simply by dragging to see if it is detached.
Note: be careful with this because it is a delicate business detaching Audio and Video

If you select the audio track in the Timeline and open the Inspector (Window/Go to Inspector) you can see the options for this Audio track like Volume and Pan.
When selecting the audio track and ctrl+click and Open in Timeline you will find also the Channel Configuration in the Inspector Window, letting you choose between Dual Mono, Stereo and Reverse Stereo, as well as the option for (de)activating the separate Channels.

But what if you really want to edit the audio as two separate audio tracks. The default for earlier versions of Final Cut Pro was 2 tracks, whereas Final Cut Pro now only provides a single track.
For this to be done stay in the TImeline where we left off and use again ctrl+click, this time select Break Apart Clip Items.
Note: this also works without needing to Detach the Audio from the Video.
Simply select the Clip(s) in the Timeline and ctrl+click Open in Timeline, then choose the Break Apart Clip Items option.

Now you are ready to edit the 2 separate audio tracks, and you can edit them as you wish, as separate tracks, razor blading, keyframing and so on.

To return to the complete timeline of your edit, the project, just use the back arrow on the top left of your timeline.
This gives you full control over your audio in FCPX.
The drawbacks of FCPX and Audio.
Being said there are things that make the earlier versions stand out in editing audio.
What if your record with for example an XDCam and find yourself with 7 mono channels, there is simply no way to separate them and edit them like you would in the Earlier versions of Final Cut Pro.
Also when you use the Opening in Timeline option to edit your audio you cannot hear the other Audio from the project, making it sometimes difficult to do precise mixing.
Be sure to keep Final Cut Pro version 7 next to the new version when you are going to do heavy editing.
Trimming, Color Correction are way better then the earlier versions but the Audio still needs some tuning in this great Video Editor.
Tutorial video:
Watch more on our video's page!
Hopefully this was a helpful insight in the Audio Editing possibilities in the new FInal Cut Pro. Keep tuned for more insights here on Broadcast Brazil.
And more practical links:
Direct link to Apple FCPX
And the free version of V-Control
Be sure to check the Broadcast Brazil Facebook page and LIKE us.
Lot's of news, photo's and info for broadcasters, webcasters and mobile producers in Brazil.
Niek van Esch